Pages

Showing posts with label cooking. Show all posts

Tuesday, April 30, 2013

I actually cooked something GOOD, Quinoa and Kale Patties


I found these yummy looking quinoa and kale patties on Pinterest, the picture really made me want to make them. I saved the image to my food board and clipped the website to my evernote. It took me a few days but I finally made it to the store to get the ingredients. These are easy to make and really don't take that much time. Plus, bonus, I can easily heat these up on my Cuisinart Griddler for a fast meal.


Flip the grill sheets around to the flat side.


Here is what mine looked like once I formed them into patties.

Brown the top and bottom in a pan. 


Finished! With an avocado spread. YUM!


Here is where I got the original recipe.
http://yummysupper.blogspot.com/2012/09/quinoa-kale-patties.html

Wednesday, July 11, 2012

How I grew cantaloupe without trying

I started with dirt and ended up with cantaloupe; how I grew cantaloupe without even trying. 


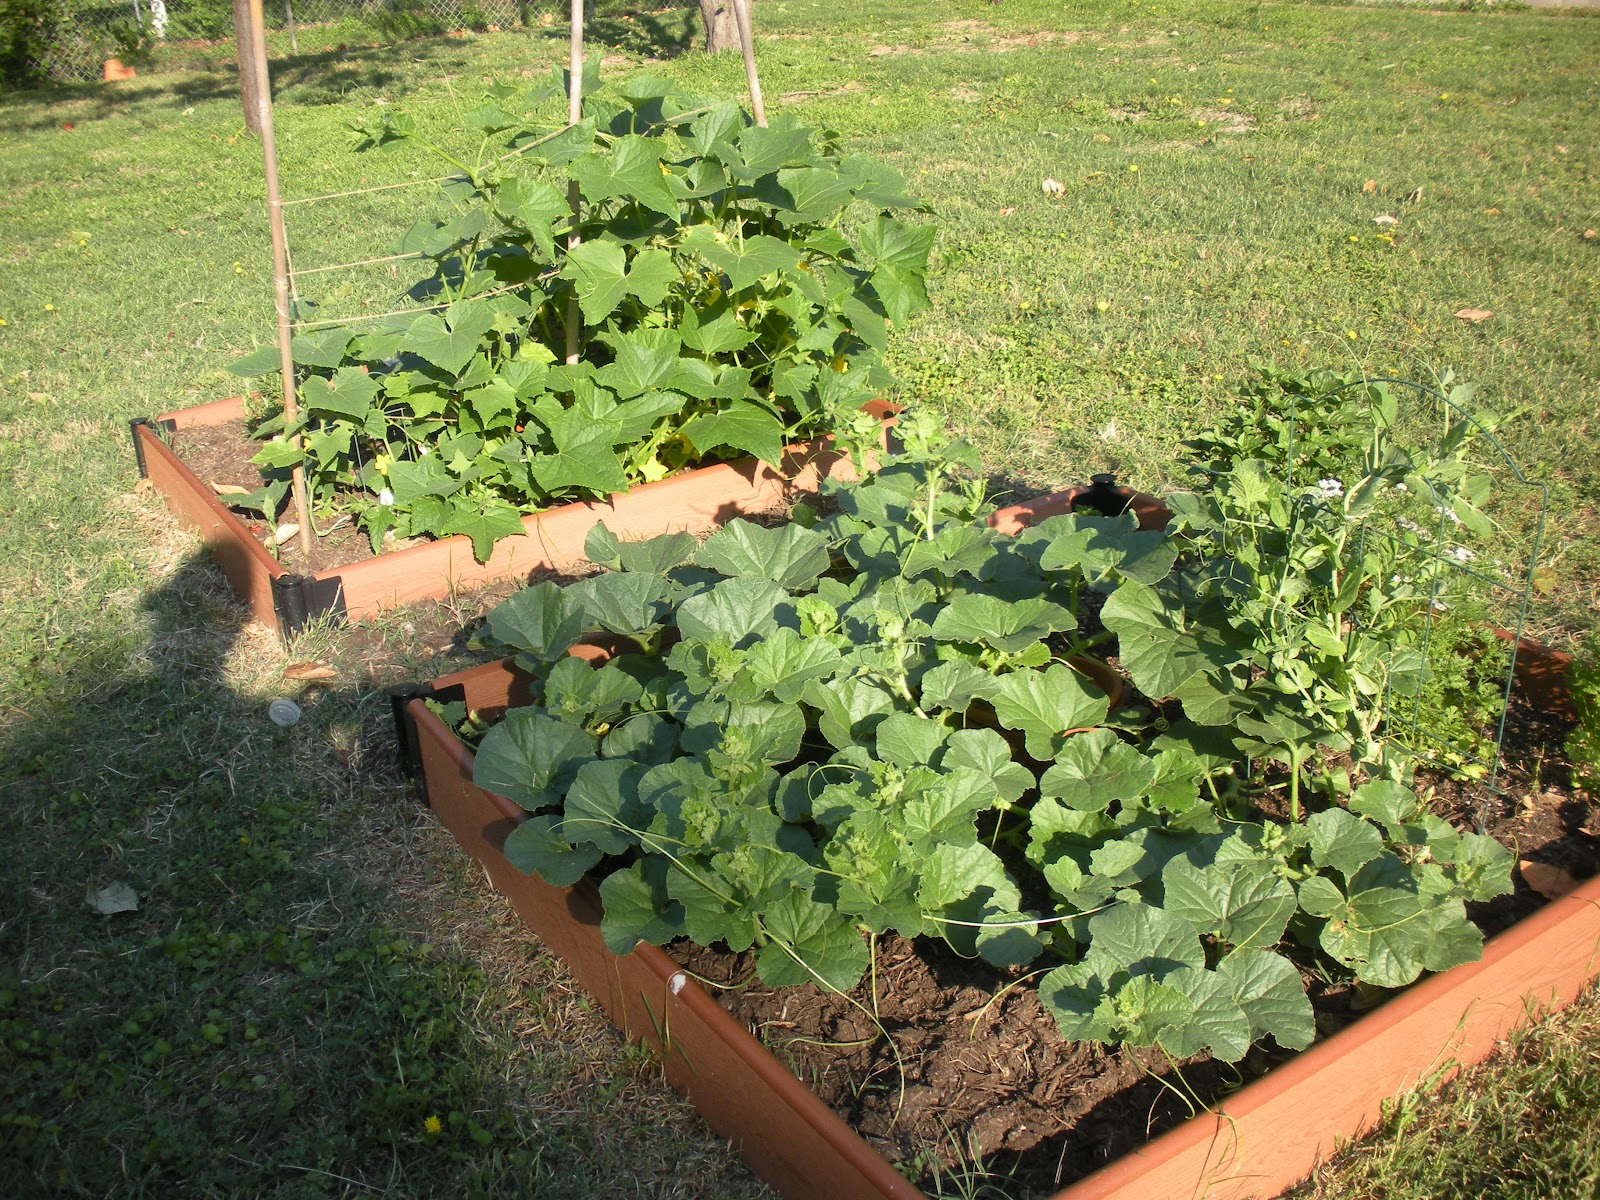
I started a gardening project early April of this year. I bought two inexpensive garden bed kits, put them together and added compost and dirt. I let them sit there for a few days and then got inspired to plant cilantro, parsley, basil and cucumbers.

Two beds await
I bought a few plants and put them in the ground. I noticed a few tiny sprigs coming up from the compost, I wasn't sure what they were but they looked like tiny bean sprouts to me. I was pretty excited, hoping they were sugar peas (I had thrown out some old seeds at some point.)

I gently pulled some out of the ground and moved them more into a row. Soon they started to grow and clearly were not beans or peas.

Various unknowns in the garden, these photos were taken early May.


Here are even more unknowns popping up.


This is how the bed started, mostly herbs, a few unknown plants.


Then the unknown plants started to take over.


And over....(in the background are the cucumber vines, they also took over the bed.)


 Until I basically had a bed of unknown plants that were pushing out the parsley, cilantro and basil.


They did start growing fruit but since I didn't plant it I had no idea what it was; looking at photos on the internet only confused me more!

Fruit that some people thought was watermelon or squash or pumpkin

Below are some photos of the progression of one unknown fruit which after weeks of growing I finally determined was cantaloupe! This is actually the third fruit, fondly called #3, I saw growing but it is the one that grew the fastest, I think because of a terracotta pot I put in the middle of the bed (it waters the bed). I should point out it grew faster but it took longer to ripen enough to pick.

If you want to see the entire album of garden photos, click here. Be warned, there are A LOT of photos. :)

June 5 it's so cute, it still is a little fuzzy.

June 5

June 6 - 3 1/2" tall

June 6 - interesting how they grow in different shapes, the oval one  stayed oval.

June 6

June 7 

June 9

June 9 

June 10 - about 4 1/2" tall

June 11 - 13 3/4"

June 13 - 14 5/8"

Decided to put a jar under it to support the fruit.

June 14 - 15 5/8

June 18 - 15 7/8"

June 21- not really growing that much 16 1/8"

Not liking the jar too much

July 10 - Full size at 16 3/8"
Between June 21 and July, I didn't take many photos and what I took is boring, it doesn't look much different. You can view all the photos in the album by clicking the link above. It took about 3 months for this cantaloupe to grow to its fullest size and fall off the vine. It might have stayed on there a few more days if the vine hadn't gotten wet from rain and the weight of the fruit made it fall off. It was interesting to see how long it took to turn brown. I had others that turned brown much earlier and had started later.

Here are some pictures of the actual fruit.
#3 cut open

Look at how much fruit there is! Almost no rind and very small seed area.


Yummy cantaloupe!

Here are few more that started to grow...looking forward to eating them in September!


Friday, June 8, 2012

Homemade Hummus with Homemade Tahini and Homegrown Cucumbers Makes a Tasty Lunch


Today's lunch; homegrown cucumber, celery, rice crackers and homemade hummus. I thought I would share this today because I made my own tahini to go in the hummus and found it to be quite simple.

I started making homemade hummus a few years ago when I got a Magic Bullet and realized hummus was SUPER easy to make and yet, quite expensive at the store. Plus, I don't know why but everything at the store is sold in huge containers, I can never eat it all before it goes bad. No one sells a single person sized container of anything unless you buy one piece of fruit. 

I had at one time a large container of tahini, again, too big for one person but that is what the store had, but in searching around the kitchen, I couldn't find it. Plus I'm pretty sure I bought it in 2010 so it probably wasn't any good.

I seemed to recall tahini was really just sesame paste. Now how do you make sesame paste? I had sesame seeds left over from my flax seem cracker project so I took to the internet to see how to make the paste. It's just sesame seeds and olive oil. Simple!

How to make tahini:
  1. Toast some sesame seeds. This doesn't take long. I burnt the first batch I toasted in the time it took me to get a lemon and olive oil out; the second batch was better. For one Magic Bullet container worth of hummus, you only need a few hand fulls of sesame seeds.
  2. In a food processor or Magic Bullet, add sesame seeds and a little olive oil. Not too much, always can add more. If you are using a Magic Bullet, use the smallest container.
 Mine maybe had a little too much oil but that was ok with me since I was adding it to the garbanzo beans with more oil to make the hummus.

How to make hummus with the Magic Bullet: 
  1. Put a full can of garbanzo beans in the tallest container for the Magic Bullet.
  2. Squeeze a little lemon juice in with the beans. Not too much, you can always add more. 
  3. Add one or two garlic gloves.
  4. If necessary and desired, you can add water or chicken or vegetable broth until the consistency is what you want. 
 I did have to add some water to get it to blend all the way. I stopped the Magic Bullet a few times and stirred the hummus to make sure all the whole beans were gone.

You can of course add other things to your hummus. Experiment and try different flavors!

This still makes a lot of hummus for one person but at least it costs WAY less. Way less? Yes. A can of beans cost maybe $1.50, a couple of cents for sesame seeds ( I used 2-3 hand fulls to make the tahini.), nominal costs for lemon juice, two garlic gloves, olive oil. The whole thing maybe cost $2.00.

In comparison, the rice cracker package cost $3.00. And don't get me started on organic cucumbers. I went to the grocery store recently and saw organic cucumbers for $2.19! EACH! Mine today was basically free since I already made up for the cost of the plants I bought with the first 4 cucumbers I cut off.


Tuesday, June 5, 2012

Great Tasting Fruit Smoothies with Cucumbers

I just love free books on the Kindle Fire. Yesterday I got an email from Pixel of Ink, a website that highlights free or inexpensive books available on the Kindle. One of the books they highlighted was Vegetarian Super Snacks. It was free yesterday, today it is still a good deal at $2.99 or free to borrow for Kindle Prime Members. I swiped (the new version of thumbed) through the book and found an interesting recipe for a blueberry and cucumber smoothie. Seeing how both my sister-in-law and I are growing LOTS of cucumbers, this interested me.

Today we tried the recipe, it was light and refreshing, perfect for the summer. We made one minor change, we used kefir instead of yogurt.

It was simple; one cup of blueberries, 2 cucumbers, a little lemon, yogurt and a little honey. That's it. I will say it makes a lot. If you have a family, this recipe is perfect. If it is just you and your cat, you might want to scale back the portions.

Fresh cucumbers from my SIL garden


Cucumbers, blueberries, honey, kefir, lemon


We used a Vitamix but any blender would work.

Nearly blended.

No spec of cucumber is visible.
Look at how smooth the smoothie looks!

By the time I got back to my house in big D I was hungry so I pulled out the magic bullet and used half a cucumber, some misc frozen fruit and some almond milk. This was also very tasty and one of the great things about a magic bullet is the single sized portion. I always seem to make too much when I use the blender and I never seem to be able to get Ginger to eat any smoothie.

So either way, whether you follow a specific recipe or wing it and throw some cucumber in with a bunch of fruit, it makes for a delicious, light and refreshing smoothie!

Stewed okra using fresh okra and tomatoes, yum!

I'm staying with my brother and sister-in-law for a few days and they have a beautiful garden full of cucumbers, tomato, okra, corn, pumpkin, beans and cantaloupe. The okra are particularly prolific. I had cut off about 4 or 5 in the morning and by dinner time there were 4 or 5 more to cut off. We had a bounty of okra an a few tomatoes; a dinner plan was forming.

I found a recipe for stewed okra using fresh okra and canned diced tomatoes on the blog, Fat Free Vegan Kitchen. Since we had fresh tomatoes that needed to be used, I cooked them for about 15-20 minutes, added a little water and spices and let the tomatoes cook down. Here is a picture of the stewed tomatoes.


Here is what the okra looked like fresh.

Fresh okra cut and ready to cook
I added the okra to the sauteed onions and cooked them for a few minutes. It was amazing, the RED okra turned GREEN! It was like magic, first they were red and then they slowing turned a typical okra green.

Okra uncooked

Okra after it has been cooking for a few minutes


 Once the okra was cooked I added the stewed tomatoes and cooked a little longer. And there you have it, stewed okra with fresh okra and fresh tomatoes. We decided to use up some pasta too and just threw it all together, results below.


Stewed okra and pasta


New Bag Styles